Page hits. I feel popular!

Friday, September 25, 2009

Sinanju Bazooka


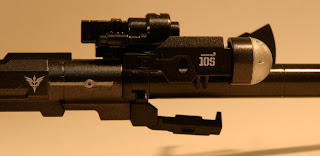
They changed the lighting rig at work so these pictures seem kind of dark, but for the most part they show what I wanted to show, ne. This was put together rather quickly and I feel doesn't quite match the rifle but stands on its own, nonetheless. Once the Sinanju is finished I will put the rifle and bazooka together for some monster guns shots!


Tuesday, September 22, 2009

Preliminary results


The black and gold masking has been done leaving only touch-up. I think I should do a panel wash for the touch up but I have to make sure the enamel I have is a gloss black and not a matt black.
This is how I ended up masking the front chest plate. I have painted on the black and will pull off the masking tomorrow.
I also tried out the shield masking technique using the foil stickers. I had already primed the shield...

... and given it a coat of semi-gloss black...

...then a coat of Mr. Color Gold... ...then top-coat...
..then masking using foil-stickers. With easy pull tabs!

And this is what it looked like after the foil stickers were pulled away.

Not too bad, I think. However, when using some thinner to try and clean up some of the black I ended up taking more paint off than I wanted. So.. I started all over again... I will try the masking and final coat tomorrow if the weather holds.

And the bazooka is finished! I will post a couple of shots here and they will have to do until I can get the bazooka into the photo booth at work.


And I also spent another two hours on decals! Yikes. This is turning into tedium. However, I still like how it is turning out so I can't stop now. Soon, all will be revealed!

Saturday, September 19, 2009

Black & Gold and a Bazooka

Which, in Gaijin Gunpla jargon, translates to 'more masking'.

With silver-week beginning here it is time for me to get my act together and try to bring this thing to completion. I have spent the last several nights sitting at my desk until 1am putting tiny decals on to big pieces of armour. Nice results, though so I shouldn't complain. I would like to show ya, but the colour scheme is still classified.

I have started the masking of the black and gold pieces. This turned out to be not as difficult as I originally imagined but just as time consuming. I won't know until I spray the gold whether I did an adequate job or not.

When I get tired of trying to place little .5 mm by .5mm decal I take a break and work on the bazooka. Which means more masking!

And the best part of today's entry; Today my replacement parts came from Bandai!
I used my last 300 yen postal money order type note thingy and it was just enough to get the 3 pieces I needed and pay for the shipping. I am so glad they came today and not after the silver week vacation. With luck I may have the torso assembled within the next week.

I also got an extra set of the gold-foil stickers from the very gentlemanly American Salaryman.

I will attempt to use them as a mask for painting the shield. If it works out, touch-up should be minimal. More on that later.

Tuesday, September 15, 2009

Test Shots

No, not the Sinanju...

I am actually testing out my new camera. I have been wanting a new one for a while now, so I finally picked up the Canon A1000IS for a good price on the Yahoo Auction site (it's your friend). I mostly wanted it for the Image Stabilization (hence the IS). Taking pictures of a 2 year old is not very easy but so far this camera has done well. I have to play with it quite a bit more but the point and shoot settings produce good results. I also have been using the Macro setting.Here is a pic of the Aurora sticker I stuck into the Bazooka. I have just started preping the bazooka for painting but will spend a little more time thinking how I want to use the two colours so it matches up well with my rifle.

I have also been working on the black/gold pieces. Here they are all primed.
And their first coat of semi-gloss black.
The shield primed and ready.
Semi-gloss black.
Then gold.
My idea is to give it a coat of topcoat, use the waterslide decals that came with the Sinanju as a mask for the center piece (and possibly the edges), paint the semi-gloss black on again, and then remove the waterslides immediately after leaving the gold untouched. Hmm.. Will it work...

Sunday, September 6, 2009

Proper Preparation - Painting Prospers

It was a gorgeous day here in Saitama on Saturday, but I couldn't take advantage of it to do any painting because I had to be at the dojo in the morning, the dentist in the afternoon and at the barber's in the early evening. I decided that if the weather was just as good the next day that I would paint the armour.

I wanted to paint all the armour piece on the same day so that they were all painted in the same weather conditions and would all have the same look and finish. With the humidity in Japan changing so frequently I have found that different parts of a model can be slightly different colours if you spray on different days even if you sprayed from the same can!

If I was going to paint everything at the same time that meant I needed to have everything prepared. I went through all the armour pieces making sure they were all primed and then attached each piece to a bamboo skewer or chopstick with a clamp or blu-tack (thanks, Tonzo!).

With all of them attached to something I realized that my spray box was not big enough to hold every piece that I planned to paint. So I grabbed two empty cardboard boxes and proceeded to make two more spray boxes. When I had everything ready it was after midnight. I took this picture.

I then went to bed and ended up sleeping maybe 4 hours as my daughter is sick right now and I can never sleep if she isn't sleeping. I think we both finally fell into a good sleep around 3 am.

The bright morning light coming through the curtains awakened me. My first inclination was to reach for my cellphone to check the time, but I knew that if I looked at the clock and it was early that I wouldn't make an attempt to get out of bed and I would miss a good opportunity to get everything done.

I dragged my sleepy self out of bed and looked outside.


The view from my 'Gunpla Room' window.
Sunny!


Perfect weather! I grabbed my spray boxes and supplies and headed downstairs and out the side door. It took me two trips to get everything outside and ready to go. I started with the bigger pieces and gave them the first coat. I tend to spray really lightly on the first coat to see which spots may cause problems and to try to prevent buildup.

Some of the pieces didn't have a proper coating of primer and that was noticeable but something that I could fix later. It took me about an hour to spray every piece of armour and I used about one and half cans of paint. Then I went inside as the house was starting to wake up.

After some breakfast and a shower I went outside to check on the pieces. There were a couple of problem pieces that I took sandpaper too right there but for the most part everything looked good. I then proceeded with the second coat. For the second coat I usually push down harder on the 'button' to get a more powerful stream and then run it across the piece quickly. I used about two cans of paint on this part. Then it was back inside to look after daughter.

A few hours later I popped out again to check everything. Everything looked good! Rather than do a third coat on each piece individually I swept the can back and forth blanketing the pieces in a mist. I would do this several more time throughout the day. Just before dinner I brought all the pieces back inside.

I kept one can for touch-up but that was minimal and has been completed. I will be picking up some more gloss topcoat tomorrow and then start coating them in preparation for decals.

Would you like to see how it turned out?


Of course you would. However, the colour is still classified until the project is complete.

Saturday, September 5, 2009

Gaijin Gunpla's Quick Guide to Wet Sanding

Why wet sand?

There a few good reasons put forward. It helps to keep dust to a minimum. It keeps the sandpaper cleaner so you don't risk scratching what you are sanding. Here I will explain my method of wet sanding. I discovered it almost accidentally and it has worked very well. Or at least, in the state I was in at the time I thought it worked well.

Step 1:

Open the refrigerator and take out your can of beer. This part is very important. Not only is it beer (!) but it is the source of your moisture for wet-sanding. By this I mean the beer should be nice and cold, it should also preferably be delicious and not alcohol-free. Condensation on the outside of the can is what you are looking for here.

Step 2:

Place the beer onto your sandpaper. You can leave it here for a short time while some of the condensation cascades down the can onto the paper.

Step 3:

Pick up your beer can, take a nice long drink, and then place it somewhere else. (but keep it close at hand in case you need some more.. moisture.) With the hand that held the beer can, pick up the part of the model you will be sanding. The moisture from the can has now been transferred to the plastic via your hand.

Step 4:

With your free hand pick up the sandpaper and start sanding. See.. wasn't that easy?

You will notice that the longer you do this method, the better you think you are becoming.


And there you have it.


Now for some bling!

Thursday, September 3, 2009

Things are starting to come together


The masking on the fuel-canisters (or whatever they are) turned out perfectly. No touch up necessary. I have taken my .02 copic marker and drawn in the panel lines. I will decal once I decide how it should look.

I need to apply some primer to the shoulders and then I am set. To remove the panel lines I had to assemble the shoulders, fill the seams, then sand and use mr surfacer for any errors. It turned out well, but I am refraining from posting any pictures until I unveil the colours because I had to prepaint some parts of it before assembly.

and...


These thrusters brought to you by Australian Blu-tack!

Mmm..