Page hits. I feel popular!

Sunday, August 29, 2010

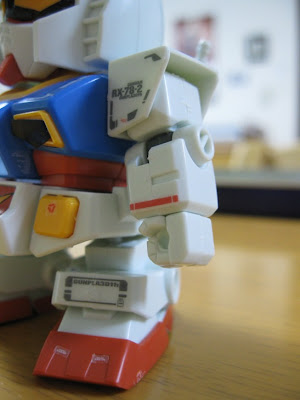
The Real Gundam! in SD!


...so it's not quite real. Or, even less real than the real Gundam.

Another day over 35 degrees. In this heat I am reluctant to step outside unless it is completely necessary, which means I need to come up with fun activities to keep myself and Gaijin Gunpla Jr. busy throughout the day so we don't just waste away watching television. Of course, there are lot of things I could be doing, and many things I should be doing, but most are not something a child could do. I noticed the 1/1 Real Gundam Project SD kit that I picked up when the four horsemen of the apocalypse, I mean, the four bloggers (of the apocalypse?) visited the 1/1 Gundam in Shizuoka on the top of the pile this morning and decided that it would be a good way to waste, I mean spend, half an hour or more.

Here are what you would regularly find inside this SD RX-78-2 Ver G30th box.

And here are the additions.
The blue stand on which the Shizuoka Gundam can be found standing, a nice background with Mt. Fuji (visible from Shizuoka?), and the Gundam decals.


The markings are the same type that were found in the new Real Grade kit. An upgrade over the normal type of Gundam sticker. However, this being an SD, these markings are very tiny. Yikes!

I won't go into the details of the build because it's and SD and there's not much to it. This, however, was not something I had encountered before.


Here's our completed kit. I actually put the markings on after Gaijin Gunpla Jr was in bed, but I did leave on the foil stickers the way she had put them on.
Look at that! She took the black stickers that were left over after you pulled of the eye sticker and put them on the kit, symmetrically! My genes, baby. I'm proud of her.

Here's a closer look at the markings. As this was built for Jr. I didn't bother to take my time with them but rather slapped them on quickly.
In other news...

Friday, August 27, 2010

Hobby Japan's オラザク Contest


This morning I mailed off my entry to Hobby Japan Magazine's annual オラザク(ora-zaku) contest. It was in the January 2009 issue of Hobby Japan that I saw the first Gundam kit that blew me away, Shimakou's Black Trinity Zaku II 2.0.


I must have flipped through the pages of that magazine dozens of times looking at all the entrants. I intended to enter a kit in the contest the next year, but missed the deadline.

When I looked through the latest issue of Hobby Japan I found the entry form tucked away in the magazine, noticed that the deadline for submissions was September 1st (!), and promptly photocopied it. Then I went out and bought a memory card and moved pictures onto it, stuffed it into an envelope along with my completed form (filled out in terrible japanese ;) ), then put it in the mail on the way to work this morning.

What kit did I enter? That's a secret. Let's wait for the results in an upcoming Hobby Japan Magazine!

I want to take a moment to thank everyone for the comments they have been sending my way and apologize because it seems blogspot hasn't been showing them all. If you've sent a comment and don't see it here, it wasn't because I deleted it, it was because blogspot did something strange which I haven't discovered yet.

In other news


I'm back to masking.

Tuesday, August 24, 2010

MG Musha Mk-II Step 4: Weapons


This blog entry is the missing #4 from the sequence of WIP for my Musha Mk-II Gundam. Okay, that's a lie. I must have mistyped when starting the next WIP after number 3 and instead of a 4 hit the 5 key. Ya, that's it. I didn't notice this at all until someone was nice enough to point it out to me. Rather than leave #4 as nothing I thought I would blog about the work I did on the Musha's weapons; the Naginata (薙刀) and the Tachi (太刀).

The Naginata

The shaft for the Naginata that comes with the kit is far too short, so the first thing I did was use one of my plastic rods and make a new one.
I also didn't like the piece Bandai designed as the tsuba (鍔) on the kit so I altered it.

Part on the right, I don't need you!
Now the length is as it should be.

The plastic rod is wider than the original shaft which means the piece that Bandai has for the Ishizuki (鐏) won't attach. I originally considered modifying the rod to fit the Ishizuki but then decided that the Ishizuki would be out of scale with the weapon and so I made a new Ishizuki by taking the existing one and gluing it to a poly-cap I found in my spare parts bin.

I then took a plastic rod of thinner diameter and glued it into the Ishizuki then drilled a hole in the new shaft and inserted it into the shaft (after painting of course).

I used Tamiya Silver Leaf paint for the Ishizuki, Tsuba, and also the blade of the weapon because a gold blade just looks ridiculous.


Because I didn't want a gold blade on my Naginata I went ahead and ordered a part from Bandai , namely the Naginata from the Shin Musha Gundam. I then used the Gold Naginata blade as a test piece for my paint thinner process because I planned to remove the gold plating from all the pieces.

However the blade for Shin Musha's Naginata doesn't mount the same way so instead of modifying the new shaft I had just made I decided to try and paint the Mk-II's blade. And, in my opinion, it turned out looking better than the silver plated blades that came with the kit. The kit's blades are of course very reflective however, because they are plastic of course, upon close inspection they lack all the things that make real forged japanese blades interesting, most importantly the 'grain', or Hada (肌), pattern produced from all the folding. The silver leaf sprayed overtop of my sanded piece produced a result similar to a real blade. So I decided to do it for the Tachi blade as well.

The Tachi

The Tachi as a weapon predates the Katana (刀) and was worn and used differently. To get the aspects of my Mk-II Tachi correct I consulted my reference books.

The Connoisseur's Book of Japanese Sword by Nagayama Kokan. Probably the most comprehensive book about Nihonto (日本刀) written in english.

Here is a picture from the book showing the shapes of the Tachi compared to the Katana.

Generally the Tachi have a deeper sori or curve than Katana and the deepest part of the curve is found nearer to the handle (Koshizori) rather than the center (Torizori). As I didn't intend to bend the blade piece at all I would need to get that effect by bending the handle, or Tsuka (柄). I grabbed a lighter and heated the piece until it was pliable.


Another thing I should mention about Tachi is that the are mostly regarded as weapons used by warriors mounted on horseback. A warrior on horseback would usually have the weapon attacehd by a long rope, or sageo, rather than have it tucked in his belt. It also would come with more elegant mountings. But how to create those mountings out of plastic?

After gluing the parts of the sheath, or Saya, together to remove the seam lines I wanted to add a nice-looking end part to it. The end of a Saya for a Tachi has a metal piece there so what I opted to do was take one of the parts from the second saya that was included with the kit and glue some plastic stripping onto it.

I wrapped this strip completely around the part and let it dry. I then took my pin vice and drilled two tiny hold on each of the long sides and one tiny hole on each of the shorter sides. I then took my side cutters and cut from the edge of the strip to the drilled hole from two angles. Then painted it Silver Leaf. You'll see the end result in the final shot.

The next step was to make the metal pieces that go around the sheath where the knot is tied. For that I took some of the small loops I made previously made from spare parts when constructing the belt and glued some plastic strip onto them, wrapped it around the Saya, and glued the other end on forming a loop.
Once dry I slid it off the Saya and painted it Silver Leaf.

For the Tsuba, or the hand guard, I took my pin vise again and drilled a large hole on each corner so that the corners were drilled off, leaving a star type pattern. For the part on the end of the handle, or Kashira, I rounded off the piece that came with the kit.
It definitely looks more like a Tachi now.

Now the blade. And I spent more time on this than I probably should have considering how difficult it is to see the results. The first step was to remove the silver plating by dropping it into a water/paint-thinner mixture and then to sand off the remaining silver. I then sanded it down repeatedly gradually increasing the fineness of the sandpaper finishing with 2000 grit.

Real Nihonto have hamon! The hamon is the cutting edge of the blade which the bladesmith covers in clay before quenching the blade in water. The result is the very sharp cutting edge Japanese blades are famous for. How the clay is applied determines the pattern of the hamon. It can range from straight (suguha) to wavy (gunome) to some fantastically elaborate examples (sudareba springs to mind).

I don't have clay... or a forge.. or real metal. I'm working on plastic so to produce a hamon on my plastic blade I thought I would try a method similar to what bladesmiths use. I took my silver gundam marker and drew a hamon onto the blade.


Also, each blade has a Boshi at the tip. This is difficult to describe but I decided to try and make one myself. Warning, bad pic on the way...

After the gundam marker I sprayed a coat of silver leaf and the hamon was visible (sorry no pics) but the piece needed a second coat of silver leaf and after that the hamon was much less distinguishable. Just like an older blade that needs a polish. haha.

And here is the Tachi as a finished product, complete with authentically tied knot.
Not bad.

Sunday, August 22, 2010

1/1 Real Gundam Project in Shizuoka


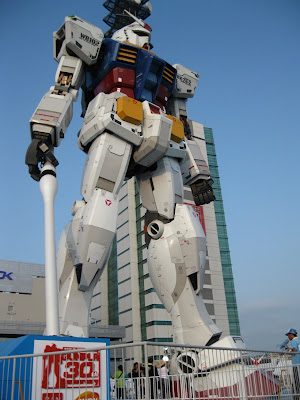
Yesterday was the big day for the long-awaited Gunplar get together with fellow bloggers American Salaryman, Buster from Plamo Addiction, Gundam Guy and myself at the 1/1 Gundam in Shizuoka. Gundam Guy and myself took the Shinkansen south from Tokyo while ASM and Buster did the same but came north from Osaka and Nagoya, respectively. We spent a good amount of time staring upwards at the metal giant as well as standing in line for one purpose or another.

I have seen the 1/1 when it was in Shiokaze park in Odaiba last year but this year it has been erected with a beam saber in its hand as opposed to on its backpack. Seeing it with people who feel the same way about gunpla as I do was rather special for me and we took our time to take in all that was the 1/1 Real Gundam project.


Of course, I picked up a few things as well. 限定! Yes, that's the Tokugawa Ieyasu version of the Musha Mk-II kit I just built.

After leaving the 'Gundam Zone' we headed to a nearby Izekaya and proceeded to drink. Lots.

Wednesday, August 18, 2010

The most beautiful Kshatriya ever


I just want to encourage everyone to head on over to fellow Gunplar, Igro's blog and check out his latest work. It's amazing!

It sure looks a lot like The Yellowbird, ね。 I think the amount of little details he added to this suit sees his Kshatriya surpass the Yellowbird when it comes to yellow awesomeness.

Enjoy!

Tuesday, August 17, 2010

What I did on my summer vacation

The new HG Gundam Avalanche Exia!

Yes, I had a week off from work and enjoyed my free time in the sunny locale of chichijima, Japan, which means I spent a lot of time in the ocean. I did, however, sneak a Gundam kit into my luggage when packing in preparation for my trip.

I've been interested in the Avalanche Exia ever since seeing master-modeler Naoki Kimura's 1/100 Avalanche Exia in an older issue of Hobby Japan. But, then again, anything Naoki Kimura does draws my interest. When the Avalanche Exia came out as an HG kit, I took the plunge and picked it up.

Because I was on vacation I was able to build while enjoying other things at the same time. Namely...
Host-supplied Asahi beer! And A&W Root Beer! I can't find this anywhere around Saitama or Tokyo, unless I go to specific international markets, however there is a vending machine on Chichijima which carries A&W Root Beer. I bought an average of two a day. I'm on vacation!

But, oh no! In my haste to get my vacation underway I left home without any tools! Not even side-cutters. Once I made it to my destination I had to search out a hardware store and find something that I could use to cut Gunpla plastic. I ended up getting a pair of 137 yen Nigirihasami cutters. But because these aren't your standard side-cutters I wasn't going to be able to get a good cut when removing the part from the runner. I lacked a design knife to clean up the nubs. What to do? I came up with a pretty ingenious way of removing the part from the runner. My fingers!

For example, here's a standard piece which is attached to the runner by three gates.
First I would cut off the 'lone' connection leaving the two symmetrical connections still attached. Then using my fingers I would rotate the piece so the connections became weak and eventually broke of their own accord.

Then you end up with this. Just some slight trimming and you're good to go. I may incorporate this method when building kits in the future.

Here's the torso. Indeed, you be an Exia.

Each arm is actually assembled using a fair number of parts. There's a lot of places that articulate and the design functions well in this regard. Cleaning up seam lines may be difficult and I haven't yet decided if I will be going this route. It's my vacation, after all. Gotta take it easy.

Upper body finished! Looking good, Ex.
And here's the skirt. I really don't need to go into detail, do I?

With this kit you have the option of building the legs in one of two forms. Big knee caps or small knee caps. Actually, there's more to it than that, but the armour on the front of the legs is where your eyes are drawn.


I built one of each to compare them. I think that big knee cap goes well with the big shoulders, but I'm not a fan of how it looks when viewed from behind. I think I will make some 'changes'.


There are quite a few pieces that are not used when building the Exia Avalanche Dash, but I can't let a nice shield like that go to waste. I just need to find a way to attach it to the MS.

Yes! This will work fine.

Here are all the weapon parts. No real need to show you how they assemble; pretty straight-forward.

The last part I assembled was the 'ski'. I originally planned to leave them off the kit but since I had some free time I thought I would go ahead and assemble them.

The 'ski' looking contraption attaches to the back of the leg and come down underneath the foot. It actually fits really well under the foot and moves with the flexing of the ankle thanks to a clever design.

Here's how it looks with its skis down. Not sure I'm feeling it.

I think it would look better like this!
Will it be possible? I think I can do it. I have everything I need to make it work I just need to 'adjust' a few things.

Here the Exia set up on the stand so as to look like it's flying, complete with all the weapons strapped to its back. That's a lot of stuff.
And then I tucked him away safely for the journey home. See you soon, Exia!

Back to real-life, back to work, and back to Gunpla! (was I ever away?)