Page hits. I feel popular!

Saturday, May 30, 2009

Happy Birthday to me!

Well, technically my birthday isn't until tomorrow. But I got to unwrap something tonight. The masking tape on my painted foot!
Looks pretty good to me! Also, I just looked at the clock and it is after midnight so it is my birthday!


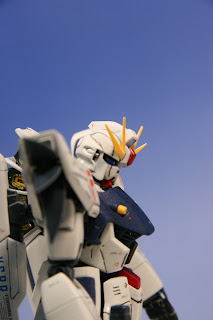
I have done some sanding on the extra plastic I added to the head. There is still more work to be done. I have almost decided on how I want to do the eyes so hopefully I can get those on soon.
And have finished setting up one half of the abdomen. I will have to putty and sand it down finding problems as I go so that the second half goes much faster.
And because I added about 5 mm of height to the lower legs I needed to come up with a way to make the ankle piston work. Here is a try-out.
Slowly making my way along. Slowly and unsurely

Tuesday, May 26, 2009

F91 Gallery

Kit: MG Gundam F91


Finally had some time to take some pics using the work setup. Definitely need more time and practice with that camera.

Monday, May 25, 2009

..so where was I?

I am all over the place with this build. I will be in the middle of a section of this kit only to stop, think about something else, put down what I am doing and pick up another section and start on it. I have been building one section, modding another, masking a different portion, and painting still others. I haven't built like this before but it is kind of fun to see where my imagination takes me.

For example, here is what I have been working on the last couple of days:

Removing the flash and seam lines to the shield and gun and painting in Mica Silver. Looks really nice too, if I do say so myself.


Here is where I had to insert .25 mm pla plate to make the foot fit snugly together.


And here are the leg extensions. I don't know if cement alone will hold them together and I have a feeling I will be puttying.

And I have added 1 mm pla plate to the seam of the head to 'volume up' it's appearance.
There are still more mods to be done to the head and I am still fighting with the torso as well as pondering what to do with the legs. I haven't touched the skirt yet but I probably will be able to finish the shield and weapons this weekend (panel lining aside).

Friday, May 22, 2009

More ...err.. adjustments.


Looks like someone else has made some adjustments as well.


The head straight out of the box has little space for the eyes, I think.

With my ..err.. adjustments I have widened that area allowing for larger eyes. I will also add some plastic to the brim of the helmet.

Here's a test build of the torso.

Is this what GG and others were warning me about? As I planned to expand the chest this shouldn't be a problem. Shouldn't.

First step was to add some plastic bringing out the vents or whatever those things are.

This already seems to cover up some of that gap. Once the glue dries I will rebuild it to see where I am at.

Hopefully I glued everything symmetrical. Lots more cutting and using glue to go. Tomorrow morning I hope to paint some pieces too. The last build saw me paint everything at the end but this time I think I will paint a little bit at a time. I think this build will take me at least 2 months as I am back and forth with it.

Also, I %(&"ed up the legs already. I shall hold off ordering parts from Bandai until I see how many more pieces I will screw up.

Tuesday, May 19, 2009

...and I thought it was going to be easy

Feet


So I picked up the verniers with plans to use them on the foot thrusters.
But as you can see they stick out too far!
How do I solve this problem? HACK!HACK!HACK!
That's better!

And now I realize that I have to adjust this piece as well. HACK!HACK!

It actually fits together very well and the clearance is just right. It also adds 1 millimeter to the height of the mech.

But that means I have to raise the heel of the foot by the same. HACK!

That's better. All ready for painting. First Mica silver, then red, then finally black.

Saturday, May 16, 2009

Verniers and Head Deconstruction


I decided to start this kit with the head. I had some ideas I wanted to try right away. Usually I start with the feet, but what the hell, eh? I changed the shape of the chin, if you want to call it that. It was too long and rectangular before, now it is shorter and sharper.


I also wanted to do something different with the eyes but before I could do that I had to modify some pieces. Here is the main piece for inside the head.And here is my new model saw.

What have I done?!?!

Don't worry, everyone. See it still fits in there nicely.

And the bottom half as well.

The top half is painted with clear orange. The bottom half will be painted black once I add some layers of plastic to make it thicker. I did sand down the tiny bumps that bandai had for eyes. ick.

I picked up some metal verniers to use on this kit.

For the back thrusters:

For the thrusters on the back of the legs:
For the bottom of the feet:
I realized I would have to modify the feet somewhat to make these fit but that is alright because I wanted to make this guy taller. I will be able to kill two birds with one stone.

Friday, May 15, 2009

Let's build something new! 新しいガンダムを作ろう。

Now that the F91 is finished and out of the way it's time to start the next one. "What is next?", you ask. I will let my daughter show you.


It's the Hi Nu Gundam!

Hi-ニューガンダムですよ。


My wife picked this up for me at Toys-backwards 'R'-Us for my birthday. It was an early birthday present because at the end of April, there was a 20% off sale.

妻は僕の誕生日の為に此れを買ってくれました。 よかった!

I intend to extend the legs and skirt to make it taller, expand the shoulders and chest to make it beefier, change the shape of the head slightly to make it fiercer, and to not make huge mistakes!

僕は足とスカートを伸び伸びして、肩と胸を大きく作って、頭の形を変化するつもりです。一生懸命頑張ります。

There are a lot of pieces to this one!

I won't be priming as I felt that was almost a waste of time with the F91 so instead I took some dish soap and a toothbrush and scrubbed the pieces while still on the sprue to take off any excess film that might prevent paint from sticking.


Then I hung them up to dry.


Next I will show you the aftermarket pieces I intend to use. Wish me luck!