Page hits. I feel popular!
Tuesday, July 28, 2009
This frame thing is almost done.
Not much of an update. I did glue the fuel tanks and will proceed to remove the seamlines in the next couple of days.
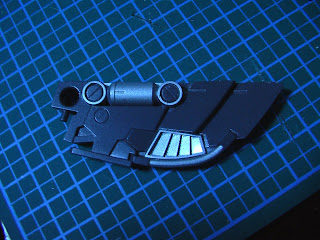
I also assembled the 'wings' that attach to Sinanju's back. Some touch up might be needed and then a few panel lines and decals.
And the top of the torso has been painted and I can assemble the frame sometime soon.
Although I have yet to touch the black pieces. I will need to do that soon so I can figure out how the hell I am going to paint them. I have an idea, which is much different than what I have seen others do so far.
Saturday, July 25, 2009
The last of the masking (probably not)
The above is the result from the masking of the cylinders. Not so bad.
And here I have masked the inner part of the skirt.
With this as the result. It came out really clean and I don't have to do any touch up.
More masking for parts of the.. wait.. what are these again? This was a little time consuming, but I had an alcoholic beverage to keep my company.
Tomorrow should be a good enough day to do some painting. The internal frame is almost all painted, but I still have to do some rather small pieces.
I haven't even touched any of the armour yet except for the head and the shoulders all the rest is still on the sprues. I also have yet to touch the thrusters but I haven't decided on a colour for those yet so they can wait.
Friday, July 24, 2009
wanna buy a Sinanju?
I was checking out the yahoo auctions and looking at the Sinanju that people are selling on there. You can find some really nice work on there.
I once saw one go for almost the equivalent of $1000 US!
I will post links for everyone to enjoy.
This one starts at 50,000 yen!
This one can be yours right now for 50,000 yen!
hmm.. Can I sell mine? かな
Monday, July 20, 2009
Body parts everywhere!
Today (monday) was umi no hi, or ocean day, here in Japan which means everyone had the day off. I used my free time to do some painting, and repainting, and masking, and painting... etc.
Let's see what we have, shall we?
First a torso. I haven't done anything with the black pieces yet so everything is assembled up until that point. I haven't included the pilot figure because I don't want a blotch of red inside the mecha and I don't have what it takes to paint the little guy. I also want to keep the cockpit space free in case I decide to put a battery in there for an LED eye.
Here is the skirt. It will just sit here for awhile until I am ready to put on armour.
Here's the arm. I want to make the moving mechanical parts stick out so they have been painted a gloss aluminum colour.
The foot. You can see the ankle part is also gloss aluminum.
And here's the leg. You can see some more moving, gloss aluminum pieces. I ran into a bit of a problem when assembling the legs.
Due to the tightness of the fit of this kit, and the layer of paint that was added, some paint came off while I was trying to assemble it. This part of the frame will be visible as it isn't covered by armour. So I am going to paint it again.
Which means I mask off the gloss aluminum parts.
Here is some more mini-masking prior to painting a different colour.
So far so good.. although I think I am going to run out of paint before I finish the whole frame.
Let's see what we have, shall we?
First a torso. I haven't done anything with the black pieces yet so everything is assembled up until that point. I haven't included the pilot figure because I don't want a blotch of red inside the mecha and I don't have what it takes to paint the little guy. I also want to keep the cockpit space free in case I decide to put a battery in there for an LED eye.
Here is the skirt. It will just sit here for awhile until I am ready to put on armour.
Here's the arm. I want to make the moving mechanical parts stick out so they have been painted a gloss aluminum colour.
The foot. You can see the ankle part is also gloss aluminum.
And here's the leg. You can see some more moving, gloss aluminum pieces. I ran into a bit of a problem when assembling the legs.
Due to the tightness of the fit of this kit, and the layer of paint that was added, some paint came off while I was trying to assemble it. This part of the frame will be visible as it isn't covered by armour. So I am going to paint it again.
Which means I mask off the gloss aluminum parts.
Here is some more mini-masking prior to painting a different colour.
So far so good.. although I think I am going to run out of paint before I finish the whole frame.
Saturday, July 18, 2009
Mono a Mono with the Mono-eye
These titles doing anything for ya?
I am hoping to use the Dark Green mono-eye and housing and I test fitted it on the head frame this evening.. Looks nice.
But, like Tonzo pointed out before...
You can't see it when the head is assembled! What to do?
And the faceplate will go on the bottom of the frame like this.
And this is more or less what the Mono-eye will look like once completed. Some adjustments might need to be made.
Now.. I really need sleep!
I am hoping to use the Dark Green mono-eye and housing and I test fitted it on the head frame this evening.. Looks nice.
But, like Tonzo pointed out before...
You can't see it when the head is assembled! What to do?
Hack! Hack!
What have I done? Actually, I saw this technique in an older issue of Dengeki Hobby (or was it Hobby Japan). These little vulcans will be painted separately from the rest of the helmet and go on like so.And the faceplate will go on the bottom of the frame like this.
And this is more or less what the Mono-eye will look like once completed. Some adjustments might need to be made.
Now.. I really need sleep!
Sinanju Group Build Project!
So it begins!
After some back and forth comments among the Gundam Bloggers the idea of a Group Sinanju Build started to take form. The administrator of the cool Gundam forum, Evil Cow, even created a thread inviting others to join. Check it out here.
More and more people have jumped on board and pictures are starting to appear, so I can wait no longer!
So far we have Gundam Guy, The American Salaryman in Tokyo, Lupes, Nightbringer and Sonar. Busterbeam will also be doing some work on his completed Sinanju. It's gonna be tight, y'all!
(It's also a long weekend here in Japan and I figured it would be a good time to start.)
Let me show you what I have in mind...
Supplies
"What's with the picture?", you are thinking. What? You're not thinking that? Well, I assumed you would think that. Let's just go with that.
I have a theme in mind for my Sinanju but I don't want to reveal it until the proper time. From now on, when it comes to colour schemes, the pictures in this blog will be in monochrome. It's a teaser for ya.
But I can show you some of the other supplies I picked up.
I have a theme in mind for my Sinanju but I don't want to reveal it until the proper time. From now on, when it comes to colour schemes, the pictures in this blog will be in monochrome. It's a teaser for ya.
But I can show you some of the other supplies I picked up.
Bazooka!
Had to pick this up on the Yahoo auction. Got it for 1,800 yen which isn't bad considering the demand for them at the time.Stand
Sinanju Action Base. The Sinanju looks awesome and I really want to be able to pose this guy for great pictures. I will have to paint the base to match the Sinanju colors.
Decals
This is mostly for the mono-eye and weapons sights. I picked up some Aurora stickers and some Green Mono-eyes as well as housings.
I already tested them out to see which one will give me the desired effect.
The one on the left is the Green Mono-eye and the right is the Aurora sticker. The Green mono eye is definitely darker although you can't tell from this crappy picture. I will try to get a better pic at some point. I may also try an LED but that's for later. I test fitted the mono-eye housing on the head piece and it looks like it will fit perfectly. I might not even need any glue!
I prepared some frame pieces for painting. I won't do much of a test build because I already know what I will need to do after staring at the instruction book for a few weeks now.
But what will I do about this seam line? This is the one thing that has me scratching my head.
Stay Tuned!
Monday, July 13, 2009
Tuesday, July 7, 2009
Finally Finalized!
I finally finished this thing! And just in the nick of time. I have completely run out of enthusiasm for this project. When originally planning this kit I had a good idea what I wanted it to end up like. I feel I have reached that idea more or less, but the getting there was definitely tough.
To end this post on a good note, I will list the bad things first. haha. And then finish with the things that I think I did well. So here we go!
The things I don't like about my Hi Nu:
Because I made a mistake right off the start in how I went about extending the legs, it took me quite a while to find a solution that I thought would work. I don't mind the proportion, but it seems that the ankle joint is really loose and I don't have faith that this thing will stand up on its own for very long. Also, the idea I came up with to extend the pistons worked pretty well except the length is slightly off so there is a risk of the piston coming out of the housing.
I originally wanted this kit to be a different colour but the shades were not correct, so I had to come up with an idea to fix it. I like the gray so I wanted to keep that. I experimented by painting matt white over the gray so I had a really light gray. I thought this would work, but using Tamiya Pure White would have cost me a fortune with all the coats I would have had to do. So I paid 198 yen at the local hardware store for a spray can. It comes out thick. So thick that it interferes with how the pieces go together. It is also difficult to sand down for repaints. I will stick with Tamiya in the future.
This was my first attempt at scratch-building the eyes, and it was more difficult than anticipated. One of the biggest problems was getting the eyes to be the same size. I got the as close as I could, but if you know what to look for you can tell they aren't. I think they are also a tad too big. I should stick with the stickers next time.
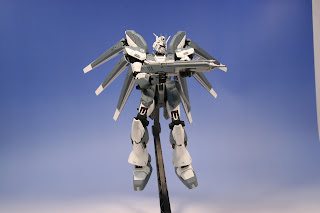
What a piece of crap. The joints on this kit can't seem to hold up to the weight of the aftermarket pieces I put on it. One of the knees was starting to give out. 'It's okay', I told myself. 'I can just put it in a cool pose on the stand'. So I connected it to the stand and a piece immediately snapped off. Now the joint at the top of the stand won't stay where I put it and only sags. So my cool pose is him just hanging around. This angers me and may be the straw that breaks Mr. Hi Nu's back.
and now... The things I do like about my Hi Nu.
It took some effort to make sure that these pieces worked, but I think the result is good. All the thrusters seem aligned and pointing in the right direction. I do feel they add to the kit.
the Head
the feet
If you have been following the blog from the beginning of this project you can see that I added about 1 mm of thickness to the head. There is no visible seam line and the proportion looks really good. Also, the expanding of the black part around the eyes worked well (except the eyes are too big ;) ) The chin has been reshaped and looks good and symmetrical as well. While I did rush the panel lines the result is still good.
These worked out really well. From the cutting and adding plastic to the filing down edges to reshape, to painting the internal parts everything seems to work well. I created the space I needed to fit the foot thrusters and didn't mess up!
I really like this shade of gray. And the Tamiya can sprays so evenly and cleanly it ends up looking really good. I have a feeling I will be using this paint in the future. I already have an idea to use it for the frame on one of my future projects. The Matt Black I used for the frame is sexy too, although depending on the climate when spraying different pieces can have different textures.
I think that about concludes my summary of this build. I my try to take pictures of this at work for some kind of gallery, but I don't have faith that the stand and joints will hold up for too much longer.
Okay, Mr. Amuro.. Walk your mecha off into the sunset.
The End
I think that about concludes my summary of this build. I my try to take pictures of this at work for some kind of gallery, but I don't have faith that the stand and joints will hold up for too much longer.
Okay, Mr. Amuro.. Walk your mecha off into the sunset.
Subscribe to:
Posts (Atom)