Page hits. I feel popular!
Sunday, March 29, 2009
Painting pt. II - the aftermath
After painting, masking, painting again, making mistakes, sanding, and painting again I finally got fed up. I mean, I finally finished. Yay! Now to coat them with a surfacer for panel line and decal detail.
Wednesday, March 25, 2009
Painting
Uncharted territory for me. Gundam kits come molded in colour so that you don't need to do any painting, however there are many builders who like to paint and I wanted to give it a try. Not owning an airbrush I am using Tamiya spray paints. First thing I did was construct a contraption to hold my pieces in place for spraying/drying. A simple cardboard box and some styrofoam and voila. (Voila is french for look at my carboard and styrofoam). Using chopsticks and skewers I was able to get everything to stay in place.
Some of these pieces will be two colours which meant I had to spray one colour on first, then mask it, then spray again. I opted to spray the light silver colour on first, followed by the black. There were a couple pieces that I sprayed too heavily which meant I had to sand down the paint and repaint it.
Monday, March 23, 2009
The Frame
When assembling Gundam models you first assemble the inner frame and then afterwards put on the armour. Here's the torso and the backpack sans coverings. Inside the torso is a little seated pilot but I don't have a picture of him.
And here is the rest of him, although I don't have the pelvis part included in the photo. Apparently, people who know what they are doing 'test-build' the entire kit to evaluate it before taking it apart and modifying, painting it. Myself, I am afraid I will break a joint or something so I elected not to fully assemble. I already know how it goes together as I have done a Zaku before.
Sunday, March 22, 2009
Back to the backpack
Saturday, March 21, 2009
Custom Gundam!
Well, not really a custom job. I haven't ventured into the scratchbuilding aspect of gundam modeling but I am putting my own paint scheme onto my next one. First thing you should do is find some lineart of the gundam you are going to be painting and then, by hand or by computer, colour it until you get something you like. As this is my first attempt at painting, I went with a simple design.
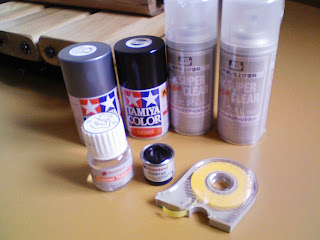
Then I needed to pick up the supplies I would need. black and light gun metal spray paint, a glossy surfacer, a flat surfacer, enamel and enamel thinner, and masking tape.
I will explain more about the uses of these supplies as I progress through the build.
Thursday, March 19, 2009
light 'em up
This was rather a rush job, but I got the kit for cheap. At first, I thought the design looked pretty cool, but didn't realize that it is also supposed to transform into a jet fighter or something. This means that assembly was more difficult than anticipated. I did, however, manage to install the LED in the head!
Tuesday, March 17, 2009
It's a toy, don't forget.
It's alive!
I took this guy home at the end of Jan. 2010 to finally fix what I didn't know was a problem back when I built him, one of my first kits. I originally used the supplied marking stickers. Bleh. Now I know that they are to be avoided. Here's the complete list of changes
1)Remove stickers and use waterslides.
2)Give kit hands to GM and replace with Bclub hands.
3)All grey pieces painted German Grey.
4)Aurora stickers used for scopes of bazooka and machinegun.
5)Bazooka and machine gun and axe painted Dark Gunmetal, with blade of ax painted Mica Silver.
6)Flat topcoat.
Here are the original shots that were used for this gallery. I have left my original write-up as it was below.
This is it, all pieced together. Before putting it altogether I weathered it using some techniques I saw on the internet. I used the marker that is the 'sand' colour and coloured it across an edge and then took a Q-Tip and rubbed it all over the edges of the model. It looks like the robot has been out in the elements and is a little dusty. I also took my rust colour marker and added rust to certain creases and joints. The photographer at work took some pictures for the site, and here they are.
Here are the original shots that were used for this gallery. I have left my original write-up as it was below.
This is it, all pieced together. Before putting it altogether I weathered it using some techniques I saw on the internet. I used the marker that is the 'sand' colour and coloured it across an edge and then took a Q-Tip and rubbed it all over the edges of the model. It looks like the robot has been out in the elements and is a little dusty. I also took my rust colour marker and added rust to certain creases and joints. The photographer at work took some pictures for the site, and here they are.
Arms and shields, etc.
Assembly of the arms was pretty enjoyable. I coloured the pistons inside the arms as I did with the legs. You can actually see part of the piston, behind the elbow when you bend the arm. The hands were a little more difficult as the pieces were fairly small. Two pieces make up one finger! I was very careful applying the dry transfer decals because I messed up with them on the Shin Musha Gundam. They turned out pretty well. Also, this was my first time in about 20 years to attempt a wet transfer decal. It turned out alright, but I don't have any kind of decal sealer so it had wrinkles. Being a little bit of a perfectionist I used my knife to scrape it off.
Backpack + Head
Assembly of the head was easy, but a little disappointing. I had originally wanted to install an LED so the eyes would light up, but couldn't make my LED circuit fit inside the head. (I made it work with another kit, but you will have to wait for that.) In the background, you can see the assembled torso connected to the backpack, although this backpack is not used by the giant robot to hold his school notebooks. I think it's called a Ransel, but.. you know..
Once again I painted, lined, and decaled before assembly. Feel like I am starting to get the hang of this.
Zaku legs
For me, this was the most fun part of the whole kit. It took me two and a half hours just to assemble one leg. The next night I repeated the process for the second. Before assembly I used the paint markers to colour the inside of the thrusters as well as using the fine-tip, or スミイレ marker to do the panel lines. Panel lines are where pieces of the machine meet and lining them with marker brings them out and adds depth overall to the piece. I also applied decals before final assembly. I also painted the pistons in the upper leg, but they got covered up by the armour so only I know what's inside!
Sexy legs!
Shin Matsunaga's Zaku version 2.0
What a mouthful that title was. As I have come to understand it, the bad guys in the Gundam universe' drive these Zaku suits. This particular one belongs to Shin Matsunaga, or the White Wolf, as he is called. Once again, I really have no idea. I just like the look of the kit.
The first page in the instruction book starts with the feet, so that's where I started. I knew I wanted to do a more detailed job on this kit than the last one, so I picked up some extra supplies (files, sandpaper, coloured markers, etc.).
What you can't really see in this picture is how I used a paint marker to colour the pistons inside the foot. That's one of the things I really enjoy about these Master Grade kits. The amount of detail in the frame. There's a piston in the front and rear of both of these fit.
Subscribe to:
Posts (Atom)