Page hits. I feel popular!

Friday, March 5, 2010

Astray ______ Frame; Work Log #4

Continuing with the huge-ass weapon. Let's have a look, shall we?

Looks like some kind of mecha harpoon for a rather large, mechanical Moby Dick.


Shall I be painting painting this piece to spice it up?

It's enormous! Really, how is this guy supposed to hold this thing? I see the handle has a hollow so it can be gripped in the hand. Ok..


Assembled before work; Day 5


I stood this baby up next to the Sinanju and it surpasses it in height.
I give to thee...

Time to talk about the katana. Or is it Tachi? Well, let's call them mecha nihontou. Wait, is Gundam Astray civilization based in Japan? Ah, who cares. Let's talk about the included weapons.

Being a person who is very interested in Japanese swords (I practice with them, admire them, study about them, and have a few in my collection) I was very happy to see that Bandai had made some effort in these MG blades.
Most noticeably on the nakago (the part of the blade that goes inside the handle). Here you can see mei, or signature. The one on the left reads Kiku Ichimonji, which is a very famous part of the Ichimonji school of swordmakers, while the one on the right reads Kotetsu, who is probably one of the most famous sword makers in Japanese history. I thought this was a nice touch by Bandai. Btw, if anyone out there is interested in learning more about/studying Japanese blades, the book to have is called The Connoisseurs Book of Japanese Swords. It has everything you need to begin, and continue, studying traditionally made japanese blades. It's probably the best book in english available and Amazon has it for a pretty good price. You're welcome.
While I appreciated the mei, I was disappointed to see no yokote or kissaki. Now I am just being picky.
With the tsuka (handle) on. I haven't put the tsuba or kashira on as I took them home to be painted earlier in the week.
The saya, or sheath, is relatively simple, no?

Assembled during lunch; Day 5

I have nuts.


And I use them to make this.
This will definitely be used a lot when it comes to posing this mecha and its monstrosity of a weapon.

Assembled before work; Day 6

So the frame is all finished which means I took it apart to use my hobby knife and remove nubs and whatnot, then divide the pieces into different sections in their own plastic bags. Now to take them home and paint them! Will I be done this weekend?
I hope so! I still have a Victory Gundam to finish decaling and the Unicorn arrives next week.

Wednesday, March 3, 2010

Astray ______ Frame; Work Log #3


With the body and major appendages assembled the more time-consuming parts of the build are out of the way, except for the giant Tactical Arms II L. All in due time. However, if you can't wait Dalong just put his review up. That guy works faster than me!

When it comes to building the skirt section of the kit not a lot of time, or description, is needed. So let's have a look at some pictures and I will keep text to a minimum. Nobody reads this anyway, do they?

3 polycaps =

Because this is part of the Clear Parts Campaign (how many of these have I done now? Hmm.. Let's see... 1.. 2.. 3.. oh, sorry. I will worry about that later.) I got a bonus set of clear parts. Why not use them so you can see some armour on this thing. The white armour pieces are still on the runner. I don't feel the need to include them in the test build and will just clip and prep for painting when the time comes. This weekend?
And here's the clear armour skirt.


Assembled before work; Day 4

Lower body assembled. There may be some limitations on the posability as the top part of the leg frame prevents the hip joint from opening much past 45 degrees.
Let's slap the torso on there.
I was going to put the arms on at this point but then realized I hadn't yet constructed the shoulders. Pretty standard fare for gunpla. But what I do find interesting is...


...this vent that goes on the back of the shoulder. Of course I am going to paint the shoulder frame a different colour so it shows through the vents. Of course.

While I'm at it...
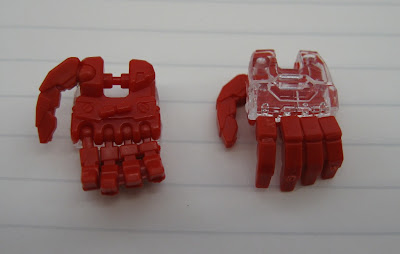
The finger-mod is technically possible, but would require cutting through more plastic than with the other MG kits (i.e. Sinanju). I don't really feel the need to do the finger mod any more to tell the truth.

Here is the um.. err... the device that clips to the Red Frame's back so that the Tactical Arms II L can be attached.


Assembled during lunch; Day 4

Show us what you got, Red.


And then it came time to do the Tactical Arms II L. I am going to get tired of typing that. This thing is big. Really big. And because it transforms between 95 different modes, there are a lot of pieces.

Step 1:

Step 2: (there's some white armour pieces that are supposed to go on here, but... you know.)
This is not a poly-cap.
Step 3:
Step 4: This thing is huge! And because of how it assembles will make painting it relatively simple. I am considering whether it is worth it to remove the seam lines.
And this is as far as I got before I had to stop for the day. Wednesday is 夫婦 (husband and wife) movie night.
Assembled after work: Day 4

Tuesday, March 2, 2010

Astray ______ Frame; Work Log #2


Let's talk legs.

I'm a leg man. I cannot deny it. For myself, assembling the legs of a Gundam is the most enjoyable part of a build. I knew going in that the legs of the MG Red Astray would be a very pleasant experience, yet it wasn't necessarily that time consuming. And the articulation!
First off, to thoroughly enjoy the gunpla, you need to rock out while building.

On the itunes: The latest album from HIM. Love this band.

Have no fear. There are wounds that are not meant to heal. and they say, 'In Venere Veritas!'

So let's have a somewhat step-by-step look at the assembly process of these articulate legs.

You can see in the picture above, the first three pieces go together rather simply, but the articulation is already evident.

Another piece and the piston later. (Of course, the pistons will be painted!)
The largest piece, the lower leg is attached. Note the poly-cap at the ankle. No surprise there.
At this point the manual says to slide the ミジ, or clip, into the leg to hold pieces in place. However, I was rather reluctant to do this because I will be taking this whole thing apart again in order to paint and I don't want to make that stage unnecessarily difficult. Don't you agree?
More articulation in the upper leg.
And another poly-cap.
And that's it for the legs. Interestingly, the instruction manual has the hip joints as part of the skirt assembly and not the legs. We're not at that part yet.
Here are the two pieces which make up the ankle.
Bandai used a double ball-joint ankle allowing the great amount of articulation that the Blue Frame exhibited. Often you will see the pro modelers replace a single ball joint with a double for the ankle.
Tuddah!
Assembled during lunch; Day 3
(And that's all I got to do on Day 3 as there was an accident on the highway and I arrived late for work by 15 minutes.)

There are wounds that are not meant to heal at all. In Venere Veritas.

Monday, March 1, 2010

Astray ______ Frame; Work Log #1

Having skipped out on the expensive Perfect Grade Red Astray, and laid off the Master Grade Blue Astray Second Revise despite Dalong's high review of it, I jumped on the Red Astray as soon as it arrived. I am building it at work during breaks so it may take me awhile. Once constructed I will take some shots then take it apart, bringing it home with me for painting. What you will see will be the test build and look rather crude for the most part.


Assembled after work, Day #1

This is the head, as you can see. This took me about 30 minutes. I hope that I can get it apart again without wrecking the eye sticker...
Red Poly-caps! There are two sets of these polycaps so expect a lot of articulation, for example...

The feet. There are two polycaps in each foot with one of them, the ankle, being in a swivel. Due to the lack of any real heavy armor I expect some high posability.

Assembled before work; Day 2

And here is something new to me; アンダゲート. Undergate. The way the molds are done allows the plastic to come up from underneath. The advantage of this is that you don't have to cut the piece from the sprue from the side marking up the part.
Once you cut it off it leaves some small nubs underneath which are simple to remove, if not a bit cramped sometimes.
The instruction manual even indicates where you can expect to find the undergate (shown with triangles/arrows).

And here is the torso mostly put together. I left off the white armour parts and the two side pistons. I took the pistons home to paint and the armour I will leave off so we can get a good look at the frame.

Front
Going to have to do something about those vents.

Back
Assembled during lunch; Day 2

And here's some pieces and subsections which together make up the arm. There are a lot of pieces and a few polycaps here.
Engineering like so...

Leaving you with some really good articulation.

Assembled after work; Day 2