Page hits. I feel popular!

Showing posts with label mods. Show all posts

Tuesday, May 19, 2009

...and I thought it was going to be easy

Feet


So I picked up the verniers with plans to use them on the foot thrusters.
But as you can see they stick out too far!
How do I solve this problem? HACK!HACK!HACK!
That's better!

And now I realize that I have to adjust this piece as well. HACK!HACK!

It actually fits together very well and the clearance is just right. It also adds 1 millimeter to the height of the mech.

But that means I have to raise the heel of the foot by the same. HACK!

That's better. All ready for painting. First Mica silver, then red, then finally black.

Saturday, May 16, 2009

Verniers and Head Deconstruction


I decided to start this kit with the head. I had some ideas I wanted to try right away. Usually I start with the feet, but what the hell, eh? I changed the shape of the chin, if you want to call it that. It was too long and rectangular before, now it is shorter and sharper.


I also wanted to do something different with the eyes but before I could do that I had to modify some pieces. Here is the main piece for inside the head.And here is my new model saw.

What have I done?!?!

Don't worry, everyone. See it still fits in there nicely.

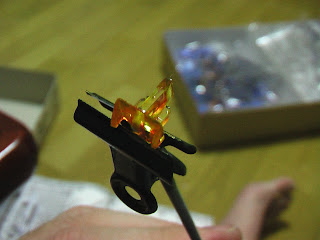
And the bottom half as well.

The top half is painted with clear orange. The bottom half will be painted black once I add some layers of plastic to make it thicker. I did sand down the tiny bumps that bandai had for eyes. ick.

I picked up some metal verniers to use on this kit.

For the back thrusters:

For the thrusters on the back of the legs:
For the bottom of the feet:
I realized I would have to modify the feet somewhat to make these fit but that is alright because I wanted to make this guy taller. I will be able to kill two birds with one stone.

Tuesday, April 14, 2009

Modifications!

This is the part I really wanted to try. Adding or removing plastic to change the definition and geometry of a piece and the project overall. Not to get too carried away, I started simple with my original design.

With these pieces that will be on top of the shoulder, I added only a couple of small pieces of plastic. I don't too many large smooth surfaces.


This is the piece that I will refer to as the groin. Haha.. Anyways, this piece is rather plain and flat. I wanted to buff it up a bit.

Taking my PIA plate sheet plastic, or styrene, and cutting some small, very small, pieces and cementing them together I was able to come up with this.
This also widens the groin area so that less of the frame shows through at that point. This is only the start of it. I will add some pieces to the guns as well and probably some more on the armour, especially the shoulder area.

Well, someone thinks it's cool.

Sunday, April 5, 2009

Kitbashing a gun

When you take pieces from different kits to construct something else it is referred to as a kit bash. I wanted to have some fun experimenting with constructing the Zaku's gun.


This is what the gun is supposed to look like.

So let's start cutting off the pieces I don't want.


Let's turn the butt of the gun upside down, permanently cement the scope on the side, and replace the barrel with that of the bazooka. Then let's add some leftover sprue pieces on the side.

Now let's spray it all black, then add some grey hosing, then decal, then mask off the parts we want to stay glossy when we spray the flat black.
And there you have it! A custom built gun.
I took this picture to show the difference between the glossy and flat top coat. That flat is sexy!