Page hits. I feel popular!

Showing posts with label F91. Show all posts

Tuesday, May 26, 2009

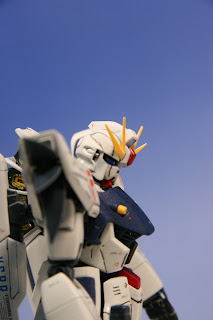
F91 Gallery

Kit: MG Gundam F91


Finally had some time to take some pics using the work setup. Definitely need more time and practice with that camera.

Saturday, May 9, 2009

I won't be defeated! (Well, maybe)

Having a couple of days to think about my mistake with the frosty flat top-coat, I decided that I would correct the problem properly and repaint the pieces rather than hand-paint over some spots. So I got out the 400 grit sandpaper and sanded away at those pieces that frosted over.
Then once that was through I masked and repainted just like I did at the beginning. It took 3 coats of paint to almost eradicate my mishap, but it turned out alright.
I waited for a gorgeous morning and then sprayed the flat coat again. HOWEVER, the some of the blue pieces frosted slightly AGAIN! The frosting wasn't enough to make me sand and paint again so I tried to remove the worst parts with my knife.

Now to work on the hands and I am finished!

Wednesday, May 6, 2009

Decals and a frosty fiasco


The last holiday in the golden week saw me sitting down with the waterslide decal sheet and some Mr. Marksoft. Holy crap there are a lot of decals on the F91! I started with the weapons first and then proceeded to the armour.
The weapons didn't turn out so bad. (just wait...)

I then proceeded to decal the armour and when that was complete (it took hours!) I started to add the metal rivets.

Here's the skirt complete with rivets and featuring my added plastic for detail!

Here's the body unit.
Here are the arms.
And here are what might possibly be my pride and joy from this project. The legs complete with my own panel lines and rivots.
When I finished the weapons and feet first, I set them up and took them outside for a flat top coating. However, because I am still a rookie, I made another rookie mistake and sprayed despite it raining outside. The cooler weather and humidity caused the flat coat to frost and turn large portions of one of the feet and the weapons white!

I panicked.

I took them back inside and used my knife to scrape away the frost but in the process took away too much paint and primer was showing through in some places. So I hand painted over top of that. The foot is salvageable but one of the weapons was a disaster.

Then I had an idea.

I took the weapons apart and switched the problem pieces around so that now the mess is on the inside where it is less likely to be seen.

I am sure a good camera will be able to pick it up though. :(

Friday, May 1, 2009

Tonight I tackle the head.

If you have been following my progress on the F91 from the beginning (It's okay. You can admit that you haven't. No one will know.) you may remember that I wrote earlier about my problems with the head. You can read about it here

Well, tonight I may have conquered!
This piece is what caused me all the problems. The two circles on either side are supposed to be yellow, but I didn't know this when I assembled and glued the head together.

I sawed through the seam I glued on the back of the head to disassemble it and take that piece back out.
I tried masking everything and painting those two circles yellow, but the paint didn't stick. So I primed it and painted it yellow, but again the paint didn't take. So I sprayed it all black.

Then I came up with a plan.

The first step was to paint the front half of the head.

"But what about the yellow", you ask? Well, I thought I would do it one better.Picked myself up some 'vulcans'. There are twenty of these suckers in the bag. This should last me through several 1/100 MG kits. But they were too long, so I had to get to trimming and filing.
Once they were the right length I had to do some modifications to some head pieces. First I had to remove the plastic that would be in the way of my shiny, new, metal vulcans. Then I took my black gundam marker to make it black again.
I also blackened the inside of the head.


Then assembled the head and painstakingly glued in the vulcans.
Sweeeeet! Now I have to reglue the seam at the back and work on removing it before painting. That's for next time.

Wednesday, April 29, 2009

Lafressia pt.2

Had a day off today and spent it painting the white pieces. Well, I only managed to paint about half of the white pieces. I underestimated how the primer would show through one coat and ended up doing two or three coats on several pieces. As a result, I went through both of my cans of Mr. Color Grand Prix White. I will have to get some more on Friday and finish the rest. As I ran out of paint, I spent the evening working on the Lafressia or whatever that thing is called. (I actually just finished watching the Gundam F91 movie so now I know what this strange this is... sorta).

I had previously gloss coated it so tonight I just did a panel wash with my gray enamel. It ran pretty good, and there are some mistakes but as I am not really concerned with how perfect this part becomes I can let some things slide. Note: I have yet to hand-paint any of these little figures that come with the gundams. One day.. one day..

Monday, April 27, 2009

Painting has begun

This weekend I was able to tear the plastic wrapper from the spray cans and start painting. So far I have sprayed the B-club hands black (sorry, no pic) and sprayed the red and blue pieces.
I have also masked off in preparation for the white. The white will be a big undertaking that will probably have to be done in at least three batches.
I have also gloss-coated the 'Lafressia' in preparation for what I expect to be a rather large and messy panel wash.
In other news, it looks like the kind gentleman over at Plamo Addiction is hooking me up with a Sinanju Bazooka! I have already started to plan out my Sinanju and this is just stoking the fire.

Friday, April 24, 2009

Optimal prime

Lame title I know, but it got your attention. I have finished priming of my Gandamu in preparation for painting. The end is in sight. Just have to paint, top coat, panel line, decal, and final topcoat. Well I thought I saw the end, but...

Another function of priming is showing blemishes and areas that need attention. There are a few areas on my panel lines that, after priming, I noticed and am not satisfied with. I will have to putty the panel lines over and scribe again. Anyways, here's the pics.

Wednesday, April 22, 2009

Pinholes and priming

The construction is nearing an end as I get closer to actually painting this thing. I did the last step before priming; making pinholes. I will be inserting tiny 1.5mm 'rivots' so I took my 1mm diameter drill bit, stuck it in my pinvise and started making holes. Once that first step was completed I changed to the 1.5mm drillbit and widened the opening of the hole slightly so that the rivot will sit flush. Well, the aim is that it sits flush, but who knows how it will go as this is my first time.

After the pinholes I moved onto priming. I took my Tamiya Surface Primer and early in the morning, before my wife and daughter woke up, stepped outside to spray a coat of primer on all the armour parts.

Before:

After:
And so on...
and so forth...