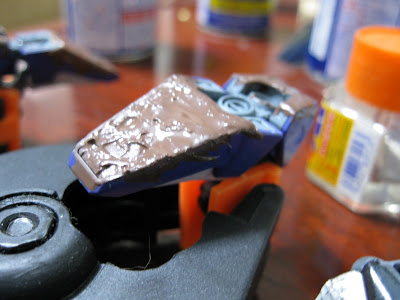
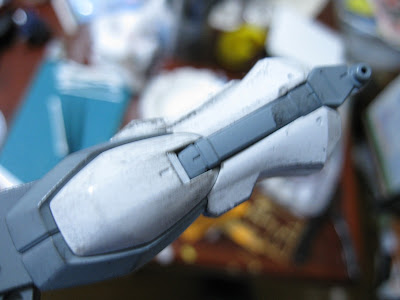
Some people have asked what my method was for creating the wear and damage on my mecha. I will give a brief tutorial here. I don't have pics for everything but hopefully my explanations will be sufficient.
1) Taking the piece I will be 'damaging', I take my dull hobby knife and tap it along the edges of the piece. For more damage I sometimes gauge out a chunk of plastic or so. This piece that is shown has only minor wear because it is the back of the shield. After the damaging I paint. Then gloss top-coat.
2)After the top coat has cured I get my enamels. I spray using Tamiya sprays which are lacquer based, so enamals are the best choice. I have black and gray for this.
and the brush I use for drybrushing is my old toothbrush. Complete with my DNA for the added touch.
3)I mixed black and gray because I didn't want a complete black for damage. Having nothing better lying around, use a straw to get the enamels into the paint tray.
4)I take the brush and use it to mix the black and gray together. Then wipe the brush thoroughly on paper I have ready. ( you can see that in this picture). I brush over the entire piece completely. It is alright if you do it excessively because you will taking most of it off later.
5)I wait a day for the enamels to dry and then get my enamel thinner.
Using a q-tip dipped in the thinner, I wipe the entire surface of the piece. The enamel that has filled the scrapes and gauges will stay, as well as on corners. If it still looks too dirty I just use more thinner. I do go through quite a few q-tips, though.
Here is another piece ready for the same treatment. It's important to top coat before using the enamel thinner as it can take off the laquer paint as well if you are not careful.
As for the Lucas Strike. He is complete now. I had to create a piece for the skirt armour because I accidentally threw it away, but it looks fine. The shield is built and ready for the final dry brushing (pics to come). The weapons are in the final stage of assembly and the extra hands were flat coated today. Just the IWSP remains.
Page hits. I feel popular!
Sunday, November 29, 2009
Wednesday, November 25, 2009
Getting dirty is time consuming
Well, not that time consuming I suppose. I have been occupied with other things (life) and have only done odds and ends on the Lucas Strike for the last couple of weeks. It doesn't help that I threw out some of the parts I needed. I received some replacements from Bandai, but didn't order everything I needed so I will be constructing one piece by myself.
Here's my progress so far. Apologies for the crappy pics, the auto focus seems to be focusing elsewhere.
Upper body is complete! yay.
Water seal decals have been applied and scratched up a bit. Flat coat has been applied as well.
And the legs are good to go. Decals and top-coat finished.
The muddy feet are all done and attached to the legs. I darkened up the mud colour by adding black and brushing more on. It improves the look of the mud in my eyes.
And the big mess that is my work table. I have pieces and paints all over my computer desk as well.
I have to finish the skirt and the extra hands and then the mecha is complete. The weapons are about half done with some masking involved. Then the remainder of the ISWP. Oh, and the shield. Can't forget the shield.
Monday, November 16, 2009
Mud ptII - He's a dirty boy
Finally got around to getting enough done to make a decent blog entry. I have done the first part of dry brushing on the armour as well as the first part of the mud painting. A lot of touch up will be needed but so far so good.
The arm after some dry brushing and cleanup with enamel thinner. I will have to decal these pieces as well. I think I will use the dry-transfers and rough them up a bit. They tend to do that on their own well enough anyway.
And here's a leg. Sorry for the blurry pics.
And a nice little hand. This set of hands comes as one piece while the other two sets need to be assembled around the weapon stock. Haven't started on the weapon painting yet, though.
Except for the swords. Silver, Gold, Purple, and Dark blue Mica. Too much?
Saturday, November 7, 2009
A real entry - Mud!
Well, I managed to make some progress but not without discovering things that will hinder my progress in the future.....
Here's the torso. It is pretty much fully assembled in preparation for the dry-brushing and adding of damage. HOWEVER, the armour pieces that go on the shoulder are missing! 困ったな。!
I must have thrown those runners out last week when under pressure to clean my area. I am debating whether or not to send in to Bandai for spare parts or make my own. But, as I am already sending in for parts for someone else, I may just add these to the order.
And here are the feet fully assembled. The detailing was done with Gundam marker and not masking. uh oh, my reputation will take a hit here.
As part of my dirt/damage I am adding mud to the bottom of the feet so it looks like the Mecha has waded through a dirty battlefield. In human history it would be earth and blood, but as this is a future robotic machine of destruction, I am imagining he waded through a field of earth and hydrolic fluid (or something.)
Step 1: Preparation
Here we have some Mr. White Putty, some water, a plastic lid, and the part I will be working on.Step 2: Squeeze some putty in there, wet your finger and smooth it out. You want it to be pretty runny but not too much. A good thrixotropic is what you are looking for here. Also, try to take a better pic of your mud. mine sucks.
Step 3: Push the foot down into the putty solution and move it around a little. Pull it off and it will give a satisfying suctioning sound, much like when you were a kid in your rainboats walking in big patches of mud while your mother yelled at you. Turn them over and let them dry.
I will be painting these with an enamel so that I can wipe off any excess easily. (I have already top-coated the armour).
That's all for now. I should have the head finished soon and then the dry-brushing starts in earnest.
Here's the torso. It is pretty much fully assembled in preparation for the dry-brushing and adding of damage. HOWEVER, the armour pieces that go on the shoulder are missing! 困ったな。!
I must have thrown those runners out last week when under pressure to clean my area. I am debating whether or not to send in to Bandai for spare parts or make my own. But, as I am already sending in for parts for someone else, I may just add these to the order.
And here are the feet fully assembled. The detailing was done with Gundam marker and not masking. uh oh, my reputation will take a hit here.
As part of my dirt/damage I am adding mud to the bottom of the feet so it looks like the Mecha has waded through a dirty battlefield. In human history it would be earth and blood, but as this is a future robotic machine of destruction, I am imagining he waded through a field of earth and hydrolic fluid (or something.)
Creating Mud
(the Gaijin Gunpla this-is-my-first-try-at-this-kind-of-thing way)
Step 1: Preparation
Here we have some Mr. White Putty, some water, a plastic lid, and the part I will be working on.Step 2: Squeeze some putty in there, wet your finger and smooth it out. You want it to be pretty runny but not too much. A good thrixotropic is what you are looking for here. Also, try to take a better pic of your mud. mine sucks.
Step 3: Push the foot down into the putty solution and move it around a little. Pull it off and it will give a satisfying suctioning sound, much like when you were a kid in your rainboats walking in big patches of mud while your mother yelled at you. Turn them over and let them dry.
I will be painting these with an enamel so that I can wipe off any excess easily. (I have already top-coated the armour).
That's all for now. I should have the head finished soon and then the dry-brushing starts in earnest.
Friday, November 6, 2009
Fill-in Entry
But that's not what I am going to write about today.
Today is the start of a gundam campaign in the seven elevens here in Japan. Just this morning I walked in and encountered these.
Little keitai straps that can be had by purchasing select beverages. I picked up the Gouf and Zaku, even though I would never strap them to my keitai. What will I do with these things?
I don't know.
Also available, RX-78-2, Zaku II MS-06S, Dom MS-09, GM RGM-79, Acqguy MSM-04, Z'Gok MSM-07, Amuro Ray, and Char Aznable.
I also saw Zaku curry. Yes, curry.
Subscribe to:
Posts (Atom)